ssl基础知识点
Introduction
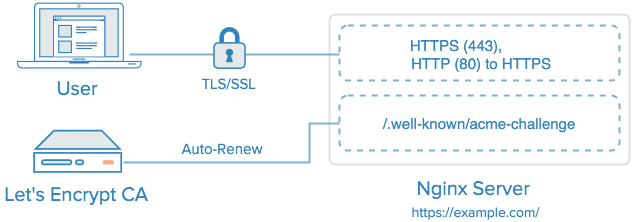
Let’s Encrypt is a new Certificate Authority(CA) that provides an easy way to obtain and installfree TLS/SSL certificates, thereby enabling encrypted HTTPS on web servers. Method to user Let’s Encrypt:
本篇文章主要讲述怎么申请免费的 https 证书用于个人网站的平常使用。
Certbot
Generate cert
在准备生成证书之前请确保所有域名都是可以正常访问的, 即先完成 NGINX 的配置, 确保每一个需要进行 SSL 的域名都是有效的, 配置 unusebamboo.com 并不一定表示www.unusebamboo.com就可以, 需要看具体的 DNS 配置策略. 生成 cert 的命令格式如下:
1 | sudo certbot certonly --webroot --webroot-path=NGINX中配置的.well-known主路径 -d 域名 -d 域名2 -d 域名3 |
下面是一个测试实例:
1 | # 原创主站 |
使用 nginx 插件创建, 此时不指定 webroot 路径:
1 | certbot certonly --nginx --agree-tos --redirect --hsts --email unusebamboo@163.com -d mail.unusebamboo.top |
使用 apache 插件创建
1 | certbot certonly --apache --agree-tos --redirect --hsts --email unusebamboo@163.com -d mail.unusebamboo.top |
renew
用于定时的更新 SSL 证书信息, 自动的对 https 证书进行续期操作, 避免免费的证书在 3 个月后自动过期.
命令:
1 | renew :check all certificates installed on the system and update any that are set to expire in less than thirty days |
crontab 配置:
1 | # 根据systemctl启动nginx |
配置步骤
Prerequires
确保域名, NGINX, 权限条件都具备, 步骤如下:
- Have an Ubuntu 16.04 server with a non-root user who has sudo privileges.
- Own or control the registered domain name that you wish to user the certificate with. ilifediary.com and
- www.ilifediary.com, may be only one above.
- Be sure to create a A Record that point to your to the public IP address of your web servers.
Obtaining the Cert
确保 http 服务, 另外 certbot 服务提供商限定一个小时最多 5 次错误请求, 所以注意配置. 获取 cert, 见 2.2 节说明:
1 | sudo certbot certonly --webroot --webroot-path=/home/bamboo/https:/unusebamboo.top -d unusebamboo.top -d www.unusebamboo.top |
At the end, your certificate and chain have been saved at–(/etc/letsencrypt/live/unusebamboo.com/), include:
1 | cert.pem: Your domain's certificate |
TLS/SSL
在生成证书之后添加一个 443 服务器配置,并把证书添加, 例如
1 | server { |
在完成上述配置之后测试 nginx 配置是否 OK 并重启 nginx 服务即可。
Restart nginx
1 | sudo /etc/init.d/nginx configtest |
Renew
Let’s encrypt certificates are valid for 90 days, but it’s recommended that you need renew the certificates every 60 days to allow a margin of error.
Notice that if you have a bundle of certificates with multiple domains, only the base name will be show on shown in the output,
but the renewal will be valid for all domains include in this cetificate. 下面是一个 crontab 定时任务
1 | 15 3 * * * /usr/bin/certbot renew --quiet --renew-hook "/bin/systemctl reload nginx" |
阿里云证书
上面的申请步骤有点太过于繁琐,实际上目前阿里云支持免费证书的申请,具体见阿里云官网介绍,在申请到指定域名证书之后就可以下载证书,比如 nginx 证书就包含如下两个文件:
1 | shop.booo.top.key |
此时就可以在 nginx 中增加 443 ssl 的 server 配置
1 | server { |
在配置完成之后重启 nginx,此时就会发现 https 服务可以正常使用了。
参考
 alipay