站内链接:

Introduction

Intro

本质上,GIT 是一个内容寻址(content-addressable)文件系统,在此文件系统之上提供了一个版本控制系统的界面。

最初,GIT 是一套面向版本控制系统的工作集,而不是一个完整的,
用户友好的版本控制系统,其包含一系列 UNIX 命令行风格的底层命令(plumbing),
其他友好的命令则被称为高级命令(porcelain).

Git Directory

当一个新目录或者已有目录执行 git init 命令时,GIT 会创建一个.git 目录,
这个目录几乎包含着所有的 Git 存储和操作对象.

如果想备份或者复制版本库,仅仅需要将该目录拷贝到另外一处即可。

GIT 目录——存储项目的所有历史,元信息(meta)的目录,包括所有的对象(commits/trees/blogs/tags):

各个文件的含义如下:

1
2
3
4
5
6
7
8
9
|-- HEAD         # 这个git项目当前处在哪个分支里
|-- config # 项目的配置信息,git config命令会改动它
|-- description # 项目的描述信息,供GitWeb程序使用,无需关心
|-- hooks/ # 客户端和服务器端的钩子脚本
|-- info/ # global exclude文件,记录不希望被记录在.gitignore文件中的忽略模式(ignore patterns)
|-- index # 索引文件,保存暂存区信息,注意是暂存区哦,非常重要的概念
|-- logs/ # 各个refs的历史信息
|-- objects/ # Git本地仓库的所有对象 (commits, trees, blobs, tags),所有数据内容
`-- refs/ # 标识你项目里的每个分支指向了哪个提交(commit)。

WorkDirectory

本地仓库所在的实际目的地,存储着你当前签出(checkout)并用来编辑的文件,
随着你转换不同的分支,它会一直不断的更改。work dir 和 git dir 的区别:

  • git 目录就是一张电子身份证,记录了你本人的所有过往信息,连带着你的家族所共同耕耘的一切。
  • 工作目录就是你此时此刻在杭州(branch 分支)中进行某些指定的操作(新的功能开发)的信息集

注意:无论你的工作目录怎么变,一旦你提交档案到公安机关,那么 git 目录会记录你所有的工作目录信息

Object

Intro

content-addressable 系统,即 Git 核心是一个简单的 Key-Value DB,
向 DB 中插入任意类型的内容,返回一个 Value, 使用 key 在任意时刻进行检索(retrieve)内容.

对象类型有:

  • blob object
  • tree object
  • commit object
  • tags object

author and commiter:作者-实际作出修改的人,提交者-最后将工作成果提交到仓库的人。

Blob object

Intro

一个文件对应一条内容,以该内容+header 做 HASH 得到值,命名文件名和子目录.

数据对象:blob object,以 SHA 值显示的对象

Test step

1
2
3
4
5
6
7
8
9
10
11
12
13
14
15
16
17
18
19
20
21
22
23
24
25
26
27
28
29
30
31
32
33
34
35
36
37
38
# Step 1 -- Initialize empty git repository
git init test

# Step 2 -- Add some content into repository
# 从stdin读入数据并write保存,命令输出一个40个字符的SHA-1哈希
# 校验值(将带存储数据+头部信息)做SHA-1得到的校验和值
git hash-object -w --stdin

# Step 3 -- Find file location
find .git/objects -type f
> output: .git/objects/d6/70460b4b4aece5915caf5c68d12f560a9fe3e4

# Step 4 -- Cat origin content by SHA-value
# 剖析对象的瑞士军刀,-p会自动判断文件类型,获取某一个对象的内容值
git cat-file -p d670460b4b4aece5915caf5c68d12f560a9fe3e4

# Step 5 -- Add a new content into repository
git hash-object -w test.txt

# Step 6 -- List all object at this repository
find .git/objects -type f

# Step 7 -- Add new message into old file and List all objects
echo "New test" > test.txt
git hash-object -w test.txt
find .git/objects -type f

# Step 8 -- Recover special version by blob object id
git cat-file -p object1 > test.txt
cat test.txt
output: old test
git cat-file -p object2 > test.txt
cat test.txt
output: new test

# Step 9 -- Get object type
git cat-file -t object1
output: blob

tree object

introduction

解决文件名保存问题,允许我们将多个文件组织到一起,
所有内容以 tree object 和 blob object 格式存储,其中 tree object 对应 UNIX 中的目录项,
blob object 对应 inodes 或者文件内容,这一点非常重要。

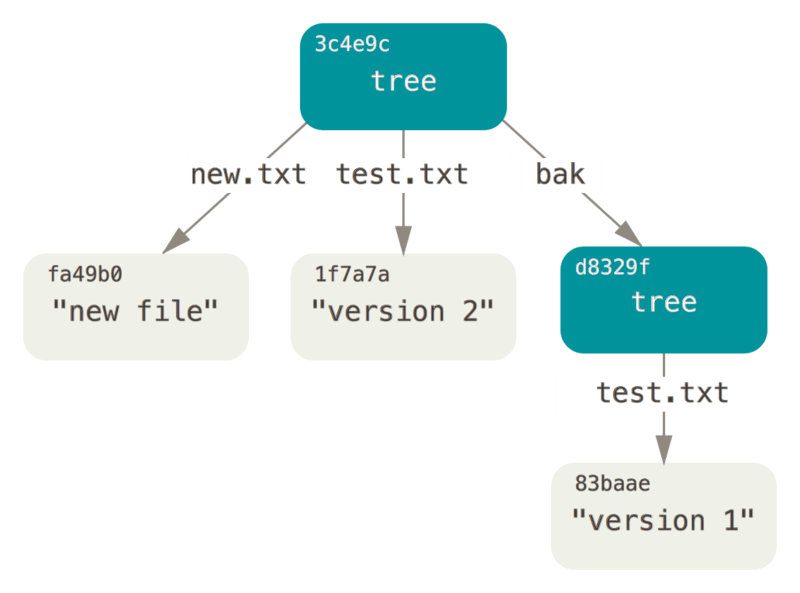
一个 tree object –> 多个 tree entry –> 一个 tree entry –> blob object 或者子树对象的 SHA-1 指针,模型,类型,文件名信息。

add

GIT 通过某一时刻暂存区(Index 区域)所表示的状态创建一个 Tree Object,从而建立一系列的树形结构.

操作如下:

1
2
3
4
5
6
7
8
9
10
11
12
13
14
15
16
17
18
19
20
21
22
23
24
# Step 1 -- Create a index region as text.txt first version
# --cacheinfo:添加的文件在DB中
# 100644-普通文件,100755-可执行文件,120000-符号链接
git update-index --add --cacheinfo 100644 version2-blob-object-id text.txt

# Step 2 -- Write index content into a tree object
git write-tree
output a tree object id: versions1-tree-object-id
git cat-file -p versions1-tree-object-id
outout : 100644 blob object-id filename
git cat-file -t versions1-tree-object-id
output: tree

# Step 3 -- Create a new tree object
# new.txt还未存储到DB中,不需要--cacheinfo选项
echo "new file" >new.txt
git update-index test.txt
git update-index --add new.txt
git write-tree

# Step 4 -- Add sub tree object
# 将一个已有tree object作为子树读入到Index中
git read-tree --prefix=bak version1-blob-object-id
git write-tree

关系图:

git add

commit

功能:保存快照,谁保存了快照,什么时刻保存的快照,为什么保存这些快照

格式:指定顶层 tree object,作者信息(user.name/user.email),留空一行,注释信息

Test:

1
2
3
4
5
6
7
8
9
10
11
12
13
14
15
# Step 1 -- Commit first
echo 'first commit' | git commit-tree sub-tree-object-id1(db839f)
output: commit-object-id1
git cat-file -p commit-object-id1
output: 对象,作者,注释

# Step 2 -- Second or third commit
# 每一次提交都是基于上一次的commit object id
echo 'second commit' | git commit-tree sub-tree-object-id2(3c4e9c) -p commit-object-id1
output: commit-object-id2
echo 'third commit' | git commit-tree sub-tree-object-id3 -p commit-object-id2
output: commit-object-id3

# Step 3 -- Look commit log
git log --stat commit-object-id3

根据上面的步骤可以知道,GIT 运行上层命令 git add/git commit 时,实际操作:

  • 根据文件创建(hash-object)Blob Object
  • 更新暂存区(update-index, read-tree)
  • 创建 tree object(write-tree)
  • 创建一个指定了树顶层对象的 commit object
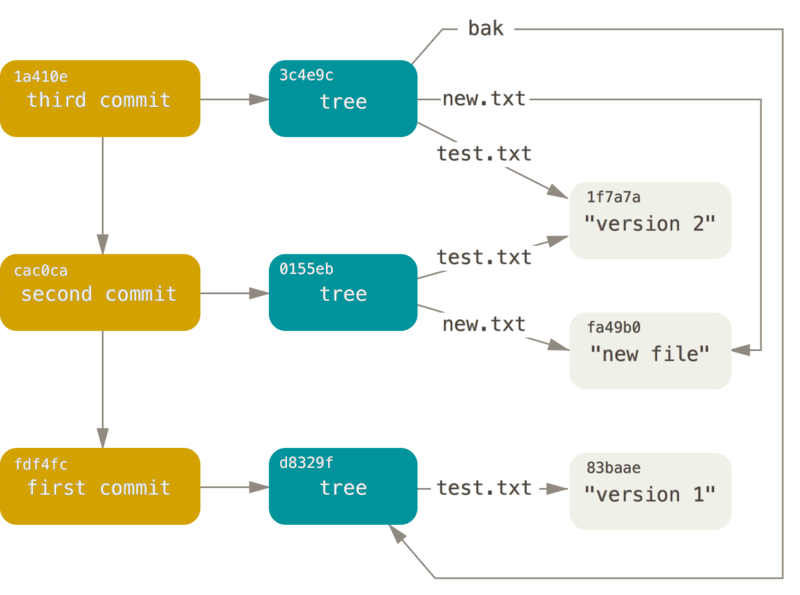
最后的对象关系图:

git commit

save

GIT 以对象类型作为开头来构造一个头部信息,ID=SHA-1(header + content)

reference

Intro

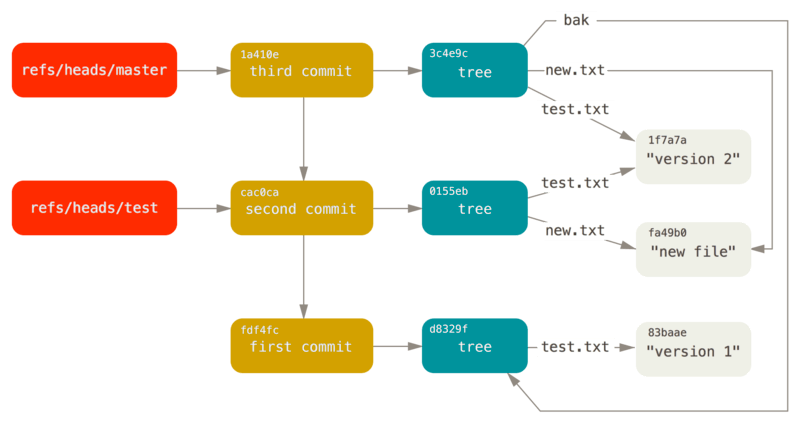
用引用文件来保存 SHA-1 值,并使用简单的文件名来替换复杂的 object id 文件名,此类文件所在的目录:.git/refs

create

创建一个新的引用帮助记忆最新提交所在的位置.

Test:

1
2
3
4
5
6
7
8
9
10
11
# Step 1 -- create
echo "last commit id" > .git/refs/headers/master

# Step 2 -- show
git log --pretty=oneline master

# Step 3 -- update
# 默认为最后一次提交。
# 运行git branch时,实际上运行update-ref命令
git update-ref refs/headers/master last-commit-id
git update-ref refs/headers/master

此时,整个 GIT 数据库从概念上看,图形结构为:

git db

第一种引用类型

HEAD 引用文件:包含一个符号引用(symbolic reference),指向目前所在的分支,其仅仅是一个指向其他引用的指针。

1
2
3
4
5
6
7
8
9
# Chapter 1 -- inspect
cat .git/HEAD

# Chapter 2 -- get reference value
git symbolic-ref HEAD

# Chapter 3 -- set reference value
# 该命令相当于checkout
git symbolic-ref HEAD refs/head/test

TAGS

第二种引用类型

正如前面所述,tags 也是一种对象类型,tag object 非常像一个 commit object,
包含(创建者信息,日期,注释,指针).

主要区别为:标签对象指向一个 commit object,而并非指向一个 tree object。

换言之,tags object 是 commit object 的优雅别名,但是并非所有 tag object 都指向 commit object.

1
2
3
4
5
6
# Chapter 1 -- create a tags
git update-ref refs/tags/v1.0 commit-object-id
output: tag-object-id

# Chapter 2 -- show tags object
git cat-file -p tag-object-id

remote

第三种引用类型

记录每一次推送(同远程 repository 操作)时分支的值,保存在 refs/remotes 目录下.
每一次进行 push/pull 操作时输出的 commit object id 都会同步到 refs/remote/origin/master 下面.

1
2
# show
cat .git/refs/remote/origin/master

远程引用和分支的区别:远程分支仅仅是只读的,所以不能通过 commit 来更新远程引用.

作用:GIT 将远程引用作为记录服务器上各个分支最后已知位置状态的书签来管理.

package

Intro

从上面的例子可知(或者假设),GIT repositry 数据中有 11 个对象:

  • 4 个数据对象
  • 3 个树对象
  • 3 个提交对象
  • 一个标签对象

GIT 使用 zlib 压缩这些简单文件,现在我们添加一个大小为 2MB 的源代码文件:bamboo.rb:

1
2
3
4
5
6
# Step 1 -- change bamboo.rb
echo "# test" >> repo.rb

# Step 2 -- get bamboo.rb file size
git cat-file -p master^{tree}
git cat-file -s bamboo.rb-file-object-id

packfile

GIT 最初向磁盘中存储对象时,使用松散对象格式,GIT 会不间断的将这些对象打包成
一个包文件(packfile)的二进制文件,以节省空间和提高效率.

当 repository 中有太多的 loose 文件,手动执行 git gc,向 remote 推送时,GIT 都会执行此类打包操作,压缩比非常高.

1
2
3
4
5
6
7
8
9
# Chatpter 1 -- packfile
git gc

# Chapter 2 -- find file
# 很多object对象不见了,出现一个新文件(packs, idx-包文件偏移信息, pack)
find .git/objects -type f

# Chapter 3 -- inspect packfile
git verify-pack -v .git/objects/pack/pack-filename

Reference

defined

refspec 是一个可选的+号,紧随其中的:组成:

  • 是一个 Pattern,代表远程版本库的引用;
  • 是远程引用在本地的位置
  • +告诉 GIT 即使在不能快进的情况下也强制更新引用

add

默认情况下,refspec 由 add 命令生成,此时 GIT 会获取 server 中 refs/heads 下面的所有
引用(见上面的引用说明),并写入到本地的 refs/remote/origin/中.

1
2
3
4
5
6
7
8
9
10
11
12
13
14
15
16
17
18
19
20
21
22
23
# Step 1 -- add
git remote add

# Step 2 -- look at refspec
cat .git/config
output:
[remote "origin"]
url=url1
fetch=+refs/heads/*:refs/remotes/origin/*

# Step 3 -- test expand reference
# 自动扩展引用规格,扩展为refs/remotes/origin/master
git log origin/master
git log remotes/origin/master
git log refs/remotes/origin/master

# Step 4 -- Fetch master only
# 仅仅更新master分支上的内容
fetch=+refs/headers/master:refs/remotes/origin/master
git fetch

# Step 5 -- Fetch master only and one times
git fetch origin master:refs/remotes/origin/master

Push

推送分支 master 到服务器上:git push origin master:refs/heads/qa/master

设置默认推送分支:

1
2
[remote "origin"]
push=refs/heads/master:refs/heads/qa/master

delete

根据上面的格式:,将 src 留空,即将远程版本库的分支 topic 定义为空,即删除。

git push origin :topic

传输协议

GIT 通过两种传输协议进行数据传输:dump 协议,smart 协议

dump

基于 HTTP 协议的只读版本库,之所以称呼为哑协议:抓取时采用一系列的 HTTP 的 GET 请求;

格式:

1
git clone https://url.git

step:

1
2
3
4
5
6
7
8
9
10
11
12
13
14
15
16
17
18
19
20
21
22
23
24
25
26
27
28
29
30
31
32
# Step 1 -- 拉取info/refs文件,该文件由update-server-info生成
Get info/refs
tree object id refs/heads/master

# Step 2 -- Get HEAD
GET HEAD
ref: refs/heads/master

# Step 3 -- Get First commit object id or tree object id
# 获取首个commit object,遍历解析获取所有的id
GET objects/ca/first-commit-id1

# Step 4 -- unzip
git cat-file -p first-commit-id1
output: 上面介绍过的commit object信息(id, author, commiter, comment)

# Step 5 -- tree object and parent commit id
GET objects/08/parent-commit-object-id1
output: data
GET objects/cf/tree-object-id1
output: 404,出错

# Step 6 -- check all repository
GET objects/info/http-alternative

# Step 7 -- check all packfile
GET objects/info/packs

# Step 8 -- parse pack and get data
# 根据idx引用文件判断是否为我们所需的信息,之后获取整个数据
GET objects/pack/pack-tree-object-id1.idx
GET objects/pack/pack-tree-object-id1.pack

smart

Intro

智能协议需要在 server 端运行一个进程:读取本地数据,理解 client 需求,回送数据,总共存在两组进程(download,uploadd).

upload

为了传输数据到 remote,需要在 client 和 server 分别运行两个进程(send-pack –> receive-pack)。一般来说,协议传输过程中使用 SSH 完成.

git-receiver-pack 会立即为他的每一个引用发送一行响应.

send-pack 会判断那些提交记录是它有用但是 sever 没有的,send-pack 会告知 receive-pack 此次推送会推送 server 没有的更新。

SSH

1
2
3
4
5
6
# Step 1 -- connect server
# 控制服务器运行命令
ssh -x git@server "git-receive-pack 'simplegit-progit.git'"

# Step 2 -- Server response
000enpack ok

https

HTTPS 和 HTTP 比较,除了握手过程不同外,其他都是类似

download

从 remote 下载数据,需要在 client 和 server 分别运行两个进程(fetch-pack <–> upload-pack).

恢复

GC

GIT 本身会时不时的运行 auto gc 命令,一旦发现有太多的松散对象(不在 packfile 中的文件),GIT 会运行一条完整的命令:git gc.

GC 代表垃圾回收,该命令会做如下的事情:

1
收集所有松散对象并放入Packfile中,将多个packfile合并为一个大的packfile,移除陈旧无用的对象.

一般需要 7000 个以上的松散对象或者 50 个以上的 packfile 才会让 GIT 其中 GC 命令,可以通过修改 gc.auto 和 gc.autopacklimit 来改变这些数值.

1
2
# Chapter 1 -- gc command
git gc --auto